Found out about this just a few days ago, pricesless. I know you can use RealVNC for things like this and its also interactive, but this is also a great option specially if you don't want to give any one access to your PC, and only want them to be able to see what you are doing.
This should work with all platforms i.e. Windows/Linux/Mac as long as the version of VLC installed is 0.8.6 or newer.
To stream your Desktop to a remote machine do the following:
First install VLC on the source (desktop you want to stream) as well as the machine that you want to watch the desktop on.
Then from command prompt (sorry as far as I know this is command prompt only) go to the directory where VLC is installed and run the following command (change the IP address to the machine you want to stream too)
vlc screen:// :screen-fps=30 :screen-caching=100 --sout '#transcode{vcodec=mp4v,vb=4096,acodec=mpga,ab=256,scale=1,width=1280,height=800}:rtp{dst=192.168.1.2,port=1234,access=udp,mux=ts}'
where:
* screen:// is our input module selection
* :screen-fps=30 specifies that we want to screengrab at 30 fps (from default 5 fps)
* :screen-caching=100 sets the internal caching to 100ms (from default 300 ms)
* --sout is our output chain.
* #transcode tells vlc that we first want to transcode the input using parameters to follow
* {} contains our transcoding parameters
* vcodec=mp4v sets the video codec to mpeg4 video
* vb=4096 sets the bitrate of the transcoded video (4Mb/s)
* acodec=mpga sets the audio codec to mpeg audio (mp3). Audio does not work yet, this is a place holder.
* ab=256 sets the bitrate of the transcoded audio (256 Kb/s)
* scale=1 sets the scaling value
* width=1280 sets the width of the transcoded video to 1280 pixels
* height=800 sets the height of the transcoded video to 800 pixels
* :rtp tells VLC that we want to use rtp protocol to send the encoder output to our receiver machine using Real Time Protocol.
* dst=192.168.1.2 is the ip address of our destination/playback machine
* port=1234 is the default port on the destination/playback machine
* access=udp specifies UDP protocol
* mux=ts sets multiplexing to mpeg-2 Transport stream
You can always change the settings as per your requirement.
On the Destination machine do the following:
open VLC,
Goto File/Open Network Stream and by default the Media Resource Locator on top of the window should read udp:// and UDP/RTP with port 1234 should be selected. If it's not select UDP/RTP (option 1) and put 1234 as the port number. Press Okay and you should see the video stream from the other machine (your server machine).
And that should be it, as easy as that.
If you want to play around a bit try 'vlc screen://' at command prompt. This should open your desktop within you session of VLC :)
Have fun!
Friday, February 22, 2008
Saturday, February 16, 2008
Google Talk with VOIP on Ubuntu Gutsy
As you all know, its been a while since I've moved from Vista to Ubuntu as my primary OS. Having done that I still miss the ability to do a few things that I used to do with Vista on XP (yes I know I can installed XP as a virtual machine, which I already have, and use that for my Microsoft environment stuff, but I'd still prefer to be able to do them directly with in Ubuntu itself).
One of the things that I missed the most was Google Talk, I was able to setup Pidgin for Google Talk but as we all know, as yet, Pidgin only lets you text chat (which it is very good at), but no VOIP. Most of my friends use Google Talk alongside MSN and that used to be my main medium for voice chat with them till I moved to Ubuntu.
I Googled around a bit and then eventually came across Jabbin. Jabbin is a Jabber (google it up) client that primarily focuses on VOIP, and supports Google Talk Voip.
To install Jabbin you can download the latest version from www.jabbin.com, the one that I downloaded was 'jabbin_2.0beta2-1baltix1_i386' (obviously for Ubuntu). You can download the .deb for this by clicking here .
The problem with installing Jabbin with Ubuntu Gutsy, which you'll notice when you try to install the earlier download .deb, is that Jabbin has a dependency on a Package called 'libssl' version 0.9.7, whereas Ubuntu Gusty come with libssl version 0.9.8. To resolve this just download 'libssl0.9.7_0.9.7k-3_i386' from any of the mirrors here. Once you install libssl0.9.7, install the jabbin .deb that you downloaded earlier and it should install without any problems.
The actual instructions for connecting to the Google Talk network are listed in detail on the Jabbin site and are pretty easy to follow. You can go directly to the page with the instruction for configuring Google Talk on Jabbin by clicking here.
I still havent tried making any calls with Jabbin yet, but regardless I am pretty excited at the possibility of being able to do it. I'll hopefully make a few calls in the coming few days time and then update here with regards to the call quality
Happy GTalk VOIPing on Ubuntu Gutsy!
Saturday, February 9, 2008
Good Quran software for Ubuntu
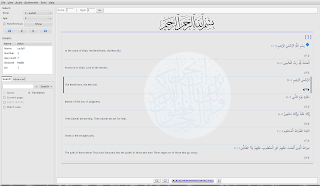
I found a good Quran software the other day, and thought I'd share it with anyone who is interested. The software is called Zekr, and supports translation in multiple languages. For those interested Zekr can be installed by following the procedure at this link:
http://siahe.com/zekr/wiki/index.php?title=Installation
This is what the application looks like
http://siahe.com/zekr/wiki/index.php?title=Installation
This is what the application looks like

Friday, February 8, 2008
Sopcast on Ubuntu
One thing that i missed a lot when I moved from Vista to Ubuntu (I still have Vista but now Ubuntu is my first choice of OS) was my favourite program for watching TV, specially live cricket :), on my PC. So I started to look around if it was possible to install Sopcast on Ubuntu. After a bit of googling I came across this site.
http://ubuntuforums.org/showthread.php?t=258049
After following the steps on this site I was able to get my sopcast running almost immediately.
The guide is simple enough so should be easy to follow.
Happy sopcasting!!
http://ubuntuforums.org/showthread.php?t=258049
After following the steps on this site I was able to get my sopcast running almost immediately.
The guide is simple enough so should be easy to follow.
Happy sopcasting!!
Step by Step Guide for Installing Ubuntu (Gutsy) on a machine already running Vista
This guide is for one of my friends who already has Vista running on their PC but wants to dual boot with Ubuntu. I thought I'd write up a tutorial just in case some some one else needs helps with the procedure.
The process is pretty straight forward, but I'd recommend that you backup anything important on Vista just in case. Even though I've never had any problems installing Ubuntu this way, but I've heard that some people have problems where Vista doesn't boot properly after installing Ubuntu. Again I've never had any problems, this is more of a precaution.
NOTE: to be continue....
Friday, February 1, 2008
Dock for Ubuntu Gutsy - Avant Window Navigator (AWN)
I heard the other day that it was possible to install a Mac like dock on Ubuntu, I've always liked the Mac dock and have the object dock installed on XP for a while as while as well. So I went on google and tried to figure out how to install this "Dock". I googled around for a while and eventually was able to identify Avant Window Navigation (AWN) as the way to go. After a bit of playing around I was able to install AWN and am glad to say that everthing has been working fine and have had no issues.
To install this is what you need to do.
- Make sure that compiz is enabled (I've already covered how to do this)
Go to
- http://www.getdeb.net/release.php?id=1865
- Download avant-window-navigator, libawn0, python-libawn0, awn-manager.
- Install them in the following order: 1) libawn0, 2) avant-window-navigator, 3) python-libawn0, 4) awn-manager
Once you are done installing you can start AWN by selecting to Application -> Accessories -> Avant Window Navigator. To modify the look and feel of AWN or to add applications you can go to System -> Preferences -> Awn manager.
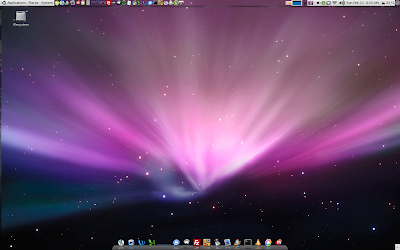
Once you are done you can add applications to AWN by simply dragging and dropping.
If you guys find this useful then do Digg!
Have Fun showing off you new Mac Like Dock to your friends :)
Tuesday, January 22, 2008
Wine Audio Error!
Today I wanted to install Winamp on my Ubuntu Gutsy. For that reason installed 'Wine' (you know the software that lets you run some windows applications on windows). Everything went fine, after that I downloaded the latest version of winamp from the winamp site and installed it by going to the terminal and typing in 'wine '. Again everything went fine. After this I tried to run winamp, this is where I got into trouble, there was no sound. To fix this I tried to play around with the Wine Configuration tool (Applications -> Wine -> Configure Wine). When I went to the 'Audio' tab, that is when I got this error message this post is about i.e. 'Wine Audio Error!'. I googled and googled and then eventually came across a post that solved my problem.
The solution to this problem is as follows:
Hope this helps!!
The solution to this problem is as follows:
- Add the repository to Ubuntu:
- Open the Terminal (Application -> Accessories -> Terminal)
- Copy and Paste the following (or type if you feel like it) wget -q http://wine.budgetdedicated.com/apt/387EE263.gpg -O- | sudo apt-key add -
- Once done type in sudo wget http://wine.budgetdedicated.com/apt/sources.list.d/gutsy.list -O /etc/apt/sources.list.d/winehq.list
- Make sure there are not error messages
- If you don't have Wine installed yet then type the following into the terminal:
sudo apt-get update && sudo apt-get install wine - If you have Wine already installed then type the following into the terminal:
sudo apt-get update && sudo apt-get upgrade
Hope this helps!!
Ubuntu Gutsy - Enabling Compiz on Asus F3sv
A few days ago, I got fed up with Vista on my new Asus F3SV laptop, so I decided on install my favorite linus distro Ubuntu on it. I'll go into details later, for now lets just say that I spend more time restarting the machine then actually working on it.
Anyways, after googling around a bit I found the easiest way possible to Install Ubuntu on the Asus F3SV laptop (I'll be posting steps to do that soon). Once this was done, the first thing I wanted to do was to get the Compiz effect running on the machine. Specially since there was my first machine with a dedicated graphic card (Nvidia 8600 GS 256 MB dedicated). As it turned out it is pretty simple to do once you know what you are doing.
First thing that I do always after installing Ubuntu is to enable the Multiverse repositories and the 'Proprietary drivers for devices' reporsitories. You do that by going into System -> Administration -> Synaptic Package Manager, once synaptic opens up then go to Settings -> Repositories, then under the 'Ubuntu Software' tab select all the repositories apart from 'Source Code'.

Once this is done, the next step is to go to System -> Preferences -> Appearance. On the screen that opens select the 'Visual Effects' tab and then select the 'Extra' Option. Once you do this Ubuntu will prompt you that 'Restricted Drivers' need to be installed. Just follow the instructions and hopeful, when you are finished following the instructions compiz should be enabled. If for some reason you still have issues, then just log out and then log back in and the it should definitely work. Have fun using Compiz on Ubuntu :D
Subscribe to:
Posts (Atom)